Tuesday, December 28, 2010

Spinach and Feta Quiche

Wow it's been a while huh? Christmas was a blur of celebration and fun, but boy do I have some exciting news!!!! I got a Kitchenaid stand mixer in Boysenberry (that's purple for you non-fruity folks) !!! Wooooo! It was a very generous gift from my husband and best friend. They like to combo-gift sometimes... And it always results in a very happy Brittany. I've always felt like a stand mixer was the last step to me becoming a real foodie. And now I am! Or will be... Target had some "shipping difficulties" (whatever that means) and it hasn't arrived yet. I will take some great photos and make something difficult in honor of it when it arrives. (Maybe a cheesecake... with whipped cream???)

In the mean time, though, I'm still cooking some good stuff in our old oven. This recipe was sent to me by my best friend Katie, and it's one of Aj's favorites! He loves it at all times of year, but I think especially in the winter. It's extremely easy to make and also very cheap! Photo to the left.

Spinach & Feta Quiche
  • 1 pre-made pie crust (in the refrigerator section, a flaky pastry crust)
  • 3 Eggs, beaten
  • 1 Cup milk mixed with 2 tbsp. flour
  • 1/4 Cup melted butter, cooled slightly
  • 1/2 Tsp. salt
  • 1/4 Tsp. fresh cracked pepper
  • 10 Oz thawed and drained spinach (squeeze the water out)
  • 4 Oz crumbled feta cheese
  1. Preheat oven to 400°F.
  2. Put pie crust into pie pan and prick all over with a fork.
  3. Bake for 5-8 minutes. Remove and set aside.
  4. Turn oven down to 375°F
  5. Combine eggs, milk/flour mixture, melted butter, salt and pepper.
  6. Stir in spinach. Then stir in feta cheese.
  7. Bake 25 minutes or until set.
  8. Let stand 10 minutes.

Tuesday, December 14, 2010

The Key to Brittles...


Remember that Homeycomb Brittle from the November Martha Stewart Living that I made a few weeks ago? Remember how I said it needed something extra? I've got the answer. A second batch of this stuff came out totally different and much more delicious. Something I'd think of making a holiday staple. The only problem is that I got impatient and chilled the chocolate covered bits in the fridge - a big no-no when it comes to milk chocolate. It makes it spotty. It doesn't taste any different but it doesn't look as nice for gift giving.

Let's go ahead and jump to the nitty gritty.

To make brittles, you need a candy thermometer. You can buy a nice one for $10 at Bed Bath & Beyond, or you can get a cheap one at the dollar store. I just upgraded from the dollar store one to the nice one. Why, you ask? The grip on the cheap one wasn't holding onto the side of the pan, and the thermometer bottom is not supposed to touch the bottom of the pan or it gives a false reading and your candies won't come out right. The nice one has a built in "cage" that prevents the thermometer from touching the bottom.

Another key thing about making brittles is patience. This honeycomb brittle is about the reverse from my family's famous peanut brittle - honeycomb brittle has a short cook time and a long dry time, and our peanut brittle has a long cook time and a short dry time. But the reason patience is key is not because you have to wait for it to dry/set/harden, though that is difficult. The reason patience is so important is because you CAN NOT leave it alone for even one minute unattended or it could ruin the whole batch. I'm quite serious.

My first batch of honeycomb brittle was good - a scorched honey taste - burned sugar flavor. But it wasn't great. The second batch I thought I'd play around with. I re-read Martha's directions and then made a few adjustments, and I think I did the right thing.

In the first batch I made, being used to cooking peanut brittle, I was constantly stirring to get it to 300°F. I think that's what gave it the scorched flavor. You see, the more you stir, the more surface area hits the boiling sugar and cools the mixture. When I didn't stir (as per Martha's directions) the mixture hit 300°F in almost record time and the brittle has a really rounded, deliciously mellow flavor.

I also decided that the brittle really needed to be covered in chocolate, and boy was that a good decision!!!! SO good it hurts.

This brittle will have people falling on their knees asking for more! Your kitchen will be acclaimed and people will want your home-made gifts of deliciousness every year. Best part about this stuff - it's wicked cheap to make! So let's get to makin'!

Chocolate Covered Honeycomb Brittle

  • 1 bag godiva MILK chocolate (Do not skimp on this, Godiva chocolates are perfect for baking and chocolate-coating. You absolutely don't want to get semi-sweet.)
  • 1 1/2 C. white sugar
  • 1/4 C. honey (I used the crystalized solidified honey that was in my pantry - Just melted it down a bit in the microwave until it came out of the bear. Perfect way to use up old honey!)
  • 1/4 C. water
  • 1 Tbsp. baking soda
  • 1/4 Tsp. vanilla
  • Wax paper
  1. In a small dish, portion out baking soda and vanilla together. Put a silicon spatula next to the dish.
  2. Find your largest baking sheet that has sides, and grease it thickly with butter. If you don't have butter (what????) use non-stick spray. The butter gives a better flavor, but it won't be the end of the world if you use spray.
  3. Bring the sugar, honey and water to a boil in a medium saucepan, stirring constantly.
  4. Put in the thermometer and turn down the heat to medium-high. It will likely get foamy and then become clear as it boils.
  5. Cook, WITHOUT STIRRING, until the candy thermometer reads 300.
  6. Remove from heat, and quickly stir in the baking soda and vanilla with the spatula, mixing until the mixture takes on a golden hue and foams up and you can't see bits of baking soda in the mixture.
  7. Pour quickly onto a baking sheet and let it sit. Do not spread.
  8. Let it cool for 45 minutes. Then break it apart into bite-sized pieces. Don't use your finger tips, but grip the pieces firmly in your hands and break with the heels of your palms for a cleaner break in the places that you want.
  9. In a microwave-safe bowl, melt 1/2 a bag of the chocolate pieces on 50% power, stirring every 30 seconds until melted.
  10. Lay out wax paper.
  11. Dip the honeycomb brittle in the chocolate mixture and lay out on the wax paper.
  12. Patiently wait for it to dry and do not put it in the fridge.
  13. Devour and make a second batch for gift-giving.
Note for storage: Store brittle in layers between wax paper in tins. Tupperwares do not work as well as tins and bad plastics can imbue smells and tastes into your food. If the gift isn't going to be given for a few days, place a sheet of wax or parchment paper over the tin and then seal the lid on top of it, and trim around it. You do not want to store brittles in with any other cookies or baked goods, because they will suck the moisture out of the other foods and become soft and gummy. Plastic baggies are OK for brittles that will be consumed in 1-2 days.

Monday, December 13, 2010

A Hot and Sour December Day

We're officially in the middle of December. It seems crazy to think that Christmas is a mere 12 days away. (And a partridge in a pear tree) I've gotten most of my holiday shopping done and am just picking away at the loose ends at this point. We've taken our Christmas photo for the year (though none of them really turned out well) and the tree is decorated and has presents under it (and the stockings are hung by the chimney with care) and my car radio is essentially permanently stuck on a non-stop Christmas music station. We're in full swing here, people!

But it's funny. You know, December in the great white north --- except it's not white. No, it's actually rainy. Not freezing rainy that poses potential threats with ice and heavy power lines. No it's a balmy 50 degrees and yesterday it didn't stop raining for even one minute. If it were snow, we'd have a foot on the ground right now. But it's rain and instead I have a puddle in my yard. I woke up this morning and the thermometer outside showed a warm 55 degrees. I cringe. I live in fear that we will have a winter without a good snow. It's ridiculous to think that, but I still worry.

This morning started off good. I was productive. Tossed some laundry in the washer and started some hot and sour soup (recipe to follow) that seemed too easy to be true. Things were going well. It was 10:30 and I had just settled down with a taste test of soup and I got a call from work. The cashier hadn't shown up. So I'm immediately tossed into scramble-mode. I switched my laundry to the drier, doled out the soup into to-go containers, got dressed, speed-straightened my hair, did my makeup, etc, etc. And out the door in 30 minutes flat! I find that somewhere between miraculous and phenomenal.

The soup was damn amazing, but the rest of the day has kind of been an exhausting drag. Believe me when I say I'm glad to have tomorrow off to get some nice R&R. I am contemplating trying to make another round of this soup using a vegetable stock or bouillon instead of the chicken stock. This hot and sour soup recipe was quick, easy, and really delicious! I felt like I was eating at a yummy Chinese restaurant and there wasn't even MSG!

For some reason, a good hot and sour soup recipe seems to be coveted. I've already had a few requests from work for this soup. I'm just glad I found an easy, authentic-tasting, not-from-a-packet recipe! Not to mention that it's low fat....

If you like your hot and sour soup with meat, replace 1/2 C. of mushrooms with 1/2 C. of pork or chicken.

Hot and Sour Soup
  • 4 C. chicken broth or stock
  • 3 Tbsp. soy sauce
  • 1 c. mushrooms, diced
  • 1/3 c. frozen or fresh peas
  • 1/2 Tbsp. garlic chili sauce (Sriracha)
  • 1/4 Tsp. ground pepper (Cracked pepper - regular powdered pepper will NOT give you the same taste)
  • 1/4 C. white vinegar
  • 1/3 C. canned bamboo shoots, julienned
  • 3 oz firm tofu, cut into 1/4 inch cubes (I used Nasoya and had good results but be careful, a block of tofu is usually 14-16 oz and you only need 3 oz for this recipe)
  • 2 Tbsp. corn starch
  • 2 Tbsp. cold water
  • 1 egg, beaten
  • 2 green onions, including stalks, diced
  • 1/2 Tsp. sesame oil
  1. Bring the broth to a simmer, and add soy sauce, mushrooms and garlic chili sauce. Simmer for 5 minutes.
  2. Add the pepper, vinegar, bamboo shoots, tofu and peas. Simmer for 5 minutes.
  3. Combine the cornstarch and water until very smooth and milky, and then add to soup and stir well. Simmer for 5 minutes.
  4. Stir in beaten egg in a slow stream. Don't dump it all at once.
  5. Wait 30 seconds and add green onions and sesame oil. Remove from heat.
  6. Serve!

Friday, December 3, 2010

Spinach Stuffed Chicken

Ah, so Thanksgiving is over and Christmas draws nearer. For me Christmas is a time of lights and cute ornaments and delicious baked goodies. Every year for Christmas my mother and I worked hard in the kitchen making our signature Peanut Brittle, chex mix, and a huge assortment of cookies and other baked goods that we gave away in mass quantity to friends and family. Since I've moved out I've continued the tradition year after year. Tons of people on our Christmas list get some of the best gifts we can give - and they don't come from stores. Treats from my kitchen are received with delight, and that makes it worth all the hard work that goes into it.

Tonight we brought home our Christmas tree. I always underestimate the low-ness of our ceiling and it didn't fail that again this year we brought home a tree that is just a wee bit too tall. We'll probably have to nip a bit off the top to get our star on. I'll never forget the first year I moved up here - we got a lovely Christmas tree, splurging since I was only working part time and work was tight for Aj - we somehow managed to get it up the curved stairs of our tiny apartment, and found a nice niche for it in the living room, right next to the window (I am extremely vain and think that the tree should be blatantly visible from the window). It was a great tree. Smelled good, looked good... was up a little too long. By the time the middle of January rolled around the tree hadn't been watered in over a month, the needles were barely holding on and we were just not interested in trying to take it down the stairs and vacuuming up after it all the way down and out the front door. In fact, we were convinced that if we tried that there would be no needles left on the tree when we made it outside.

So we concocted a great plan - we would squeeze it out the window!! Yes, quick relief! Funny thing - trees do not like to be pushed out of 3x3 windows. By the time we got out out of our second story window it slid down the roof and landed with a huge thunk on the ground (Don't worry, Aj was below making sure it didn't hit anyone) and it lost 75% of its needles on the walkway. The other 25% were on my windowsill and living room carpet. Ah, Christmas!

During the holiday season I like to try to temper my huge intake of delicious sweets with some more low-fat options. I was poking around on the internet a month or so back trying to find some good low-fat recipes with flavor, and I stumbled across this Spinach Stuffed Chicken recipe. It's absolutely yum and I've made it three times since I found it (which, for me, is a lot in a 1-2 month period). The recipe had no photos and didn't really have anything else to recommend it to me, but I took a look at the ingredients and knew it would be a winner. This is a fast meal for a night when there's not a lot of time to cook. I served this with garlic and olive oil couscous, and a saute of mushrooms and Japanese leeks.

Spinach Stuffed Chicken

  • 4 chicken cutlets (breast meat) or chicken breast cut in half lengthwise
  • 5 oz. (frozen) thawed and drained spinach
  • 1/4 C. Parmesan cheese, shredded
  • 1 scallion (green onion) finely chopped
  • salt and pepper to taste
  • 1/4 C. red wine vinegar
  • 1 Tbsp. light margarine or spread
  1. Put chicken cutlets one at a time between plastic wrap and pound quite thin with a meat mallet or rolling pin. (The thinner the better)
  2. Rub chicken cutlets with salt and pepper to taste.
  3. In a small bowl, mix together the thawed and drained spinach (make sure to squeeze out any excess water), scallions, parmesan cheese, and salt and pepper.
  4. On one end of the chicken place 1/4th of the spinach mixture and fold the chicken over, pinching the edges to seal. Repeat with all chicken cutlets.
  5. In a nonstick pan, spray very heavily with olive oil nonstick spray and let the pan get hot.
  6. Cook the chicken in the pan approximately 6-8 minutes on each side, flipping once, over high or medium high heat.
  7. Remove the chicken from skillet and place the red wine vinegar into the skillet for about 1 minute, letting it simmer and thicken a bit.
  8. Mix the red wine vinegar with the margarine until melted and pour over the chicken

Per Serving: 243 Calories; 5g Fat (18.1% calories from fat); 2g Saturated Fat;45g Protein; 3g Carbohydrate; 1g Dietary Fiber; 110mg

Tonight I also made a tester batch of a brittle I spotted in Martha Stewart Living's 2010 holiday issue. It turned out pretty good. It's got a slightly scorched, honey taste and a really light and fluffy texture. It was beyond easy to make. I'm thinking it needs a little something extra... Maybe a sea-salt coating or dipping it in chocolate? It could just need a little vanilla extract or butter. I'll mess with it a little more as we go into the holidays, since it was so simple and inexpensive to make. Once I find just the right recipe, I'll pass it on to you guys. I'm going to take it in to work tomorrow and see what everyone thinks of it as it is.

If you want the recipe as MS Living gave it, here is a link to another blogger that gave it a try: Honeycomb Brittle.

Wednesday, November 24, 2010

Thanksgiving is almost upon us....

Today I spent most of my day in the kitchen - cleaning and cooking. Mostly cleaning though. Now I'm pretty pooped and relatively determined that the first thing on my list to Santa this year will be a dish washer. You see, we don't have a dish washer. Well... we have one... it's from 1960 and doesn't work, though. We also don't have a garbage disposal. That's right, folks, we wash all of our dishes by hand and we can't throw whatever we want into the sink! So cooking is not just a matter of making dishes, but also one of CLEANING dishes. You have to think "how many times can I use this fork to mix this or that" while you bake. Or wonder whether the spatula REALLY needs to be thoroughly washed or if you can just give it a nice rinse with hot water. Because every dish you make you know you have to wash. It's quite tedious, really.

Usually Aj lets me off the hook - I clean, and he does dishes. But he didn't want to do the dishes last night and like a ninny I said it was OK. There were a lot of dishes!!! After about 3 hours of cleaning and cooking my back was tense and I was ready to sit down. But of course anything I didn't prep today would just mean I'd be waking up even earlier tomorrow. So cooking it was! Funny thing is, by the time I made it to dinner all I had energy for was heating up a can of Spaghettios... but I digress.

This blog is about recipes, right?! There's one dish I make every year. In my eyes, it's not Thanksgiving without Sweet Potato Casserole. Now a lot of people do crazy caramel pecan brown sugar streusel shenanigans, but for me it's the marshmallow topping! Yum!! This recipe was passed down to me from my father, and tweaked slightly. The photo is before topping is added, since I'm prepping in advance for baking it tomorrow. If you have a small family to feed, or want to make this on a regular weeknight, just halve the recipe, using 2 eggs instead of 3.


Sweet Potato Casserole
  • 7-8 lbs peeled & cubed sweet potato, boiled until soft
  • 2 tsp. Vanilla extract
  • 2 Eggs
  • 1/2 C. White sugar
  • 1/2 C. Light brown sugar
  • 1 stick of butter, cut into 1tbsp chunks
  • 3 Tbsp. Flour
  • 1/2 tbsp. Cinnamon
  • 1/4 tsp. Nutmeg
  • 1/4 tsp. Cloves
  • 1/8 tsp. Ground Ginger
  • 1 Bag jumbo jet-puffed marshmallows
  1. Mash together boiled potatoes and butter either by hand, or with an electric mixer, until creamy.
  2. Add in flour, spices, and sugar and mix together.
  3. Add in eggs and vanilla and continue mixing until creamy but slightly stiff. If potatoes won't stiffen, add a bit more flour.
  4. Pour into a casserole dish and bake at 350°F for 25 minutes.
  5. Remove from oven and cover with jumbo marshmallows, leaving small spaces in between each.
  6. Return to oven for 5 minutes or until marshmallows are toasted.
I also made a pie tonight. Unfortunately, the ginger-snap crust became overcooked because the oven temperature fluctuates too high, and the pan was too close to the heating elements. Here is a photo of the pie before it went into the oven. Don't get me wrong, we're still going to eat it! It's just that the crust is a bit burned and we aren't sure we want to take it for Thanksgiving tomorrow. We might just eat the filling, which turned out delicious. I made the filling with pumpkin eggnog instead of the traditional cream or condensed milk. If it weren't for the burned crust, this pie would be DELICIOUS! I'll definitely have to try the recipe again and maybe I can post it when it's a little more tried and true!

Sunday, November 21, 2010

A Firey Sort of Night

Mere days from Thanksgiving! Man, has it been busy... Work is busy, home is busy - everything is busy! Today Aj and I set to work doing a little "fall cleaning" if you will. Things needed to be done. Weird places dusted and cleaned, rugs washed, front porch swept. All those things you look at and say "Uhg that looks awful... I need to take care of that" and then go about your merry way. Today was for all of THOSE things. We're preparing the way for holiday baking, tree trimming, and general merrymaking. This is my favorite time of year (though not my favorite season). Food, laughter, family, snow and pretty lights - that's what makes winter awesome!

Tonight I'm making two recipes given to me by friends. Jalapeno Cornbread, and Baked Buffalo Wings. The spicy kick to both of them are perfect as the weather gets colder, and really they're not that bad for you! Not really particularly GOOD... but not bad. All of us being from the south, the recipes have to be tried and true before we pass them on. We know what's good, so it's our duty to share it - girl to girl.

Baked Buffalo Wings

Preheat oven to 400°F

  • 3/4 C. Flour
  • 5 Tsp. Cayenne
  • 1/2 Tsp. Garlic powder
  • 1/2 Tsp. Salt
  • 20 Chicken wings (opt for party wings if you have the option)
  • 1/2 C. Melted butter
  • 1/2 C. Frank's Red Hot
  1. Line a baking sheet with aluminum foil & grease with cooking spray.
  2. Place flour, cayenne, garlic powder & salt into gallon bag and shake to mix.
  3. Toss chicken wings in flour mixture
  4. Place the wings on the baking sheet and refrigerate for at least 1 hour (this helps keep the coating on as they cook)
  5. Whisk butter & hot sauce in a small bowl and dip the wings in to coat. (Be careful, if you have cuts on your hands it will burn! Working in a book store, I've always got one papercut or another...)
  6. Bake time (party wings) 20 minutes. Bake time (full wing) 35 minutes. Turn wings 1/2 way through cooking. If any sauce is leftover, you can baste the wings with more sauce after turning.
Nutrition: Serves 4. Calories: 343 Fat: 22.5g Carbs: 19.1g

Jalapeno Cornbread

Preheat to 400°F

  • 1 box Jiffy cornbread mix
  • 1 egg
  • 2/3 c. milk
  • 1/4 c. finely chopped nacho jalapenos
  • 2 tsp. jalapeno juice
  • 1 tsp. minced garlic
  • 1 tsp. garlic juice
  1. Combine all ingredients in a mixing bowl.
  2. Fill muffin cups almost all the way full and let sit for 5 minutes.
  3. Bake at 400°F for 10-15 minutes.
The sweetness of the Jiffy cornbread pairs really well with the spicy, vinegar-y nacho jalapenos. A really quick add on to dinner! If you don't use muffin cups, make sure to grease your pan.

Thursday, November 11, 2010

Dinner with Anthony Bourdain

Usually Thursdays are a total scramble. It's up in the morning at 6:30 AM and out the door by 7:30 - then it's the usual chaos of work, until 4 PM when it's time for Aj and I to go to our Japanese class (which doesn't start until 6:15, but the commute is an hour long if traffic is good) and then after that it's around the corner to our favorite Japanese hot spot in Cambridge - the Porter Exchange for some curry at Cafe Mami. And finally back home. We're lucky if it's before 10 that we get back home to shower and stumble to bed after a little TV.


Today was different though - a bit. Since it's Veteran's day the school is on holiday, and we realized just before leaving that there might not be classes. Sure enough a quick check of the website confirmed that and then it was "Well what do we do for dinner?" Thursday dinners are a fixed thing - every week it's curry at Cafe Mami. We thought about driving down just for the curry, but I had some curry roux and chicken thighs calling my name, so I volunteered to make our regular meal.


Maybe I should explain why we're taking a Japanese class and how I know how to whip up a "Tatsuya" Curry. As it would turn out I've always had a passion for Japanese culture, and in college I decided to study abroad. While there I fell more in love with the culture and even more in love with the FOOD. The Japanese really know how to make comfort food. You thought biscuits and gravy or mac and cheese was comfort food? Ah try a good hamburger steak with a fried egg and a ginger ponzu sauce, or a piping bowl of ramen from a road side stand - better yet try that pancake filled with red bean paste.


Well despite the language barrier while I was in Japan (my japanese was passing by the end of the stay, but at the beginning it was a great game of charades) I quickly picked up a lot of cooking techniques and recipes or just general love for certain foods that I had to recreate when I returned to the states. Now Aj and I are planning a vacation-length trip to Japan so that I can show him the temples and we can experience the culture and food together. It's a kind of belated honeymoon.


So now you know - I'm not just a southern girl cooking in a Yankee kitchen, but I'm also endlessly inspired by Asian cuisine. You'll see a lot of that here mixed in with the traditional American regional foods. Didn't take me long to break you in - Honestly I had planned to take it easy - start traditional - but life throws things your way and you have to share them.


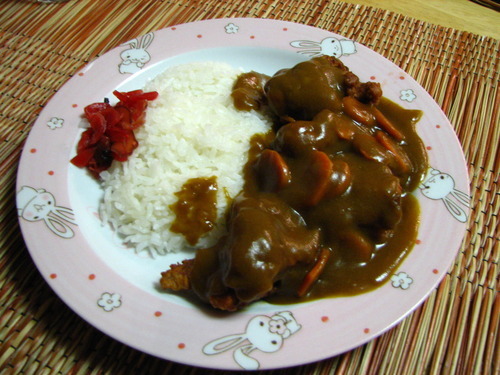
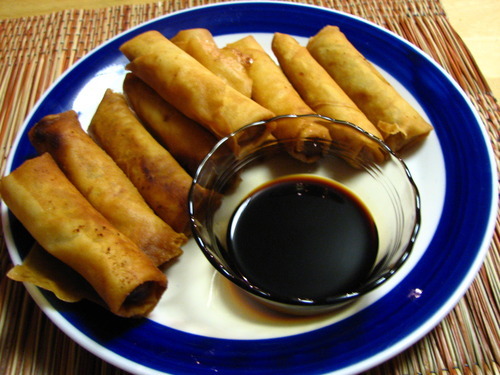
So tonight was Chicken "Tatsuya" Curry paired with a Filipino spring roll called Lumpia. After Aj made a banzai run to the grocery to pick up some peanut oil, we were on our way. We ate in front of the TV, watching an episode of Anthony Bourdain on netflix where he visits Japan. It was a great evening in.


First things first - the rice. I have a rice cooker and have always had one. I don't make rice traditionally on the stove, so I can't help you there. But I'm telling you now - when it comes to Japanese foods you have to go with short grain. And I mean short grain - you're looking for Sushi rice. Kohaku Rose is usually sold at places like Walmart and is acceptable, though a higher quality rice is always going to taste better. The first rule of cooking Japanese rice is that you have to WASH IT. Wash it wash it wash it. Until the water runs mostly clear. Follow the directions on the bag and don't cook it like you would cook regular rice. Shorter rice means less water necessary for cooking.


Now we can get to the "Tatsuya" Curry. The difference between Tatsuage and Karaage is that one is marinated first. We're trying to mirror the Cafe Mami curry here, so we're going with Tatsuage. However, if you don't have 20 minutes to marinate, skip it and go straight to the batter. Won't be as good, but certainly won't be bad!!!


Ingredients:


  • 4 Boneless skinless chicken thighs

  • 1 carrot, sliced in thin rounds.

  • 4 cubes of curry roux from a band like S&B or Vermont Curry (available at many wal-marts or asian grocer)

  • About 1/2 c. cooking/cheap Sake (Japanese rice wine - about $4-5 at a grocery store. Substitute = any really mild white will do)

  • 2 tbsp mirin, or aji-mirin. (Found at Asian market, or on Asian aisle of grocer. Substitute = sugar)

  • 3 tbsp soy sauce (I swear by Yamasa brand)

  • A bit of grated ginger (Substitute = powdered ginger)

  • 1/2 c. flour

  • 1/4 c. Potato, arrowroot, or corn starch (This is important - it gives it that nice crisp and thick fry)

  • Pepper

  • Water or chicken broth

  • Peanut oil for frying (Substitute = vegetable or canola)


  1. Marinate the chicken in the sake, mirin, soy sauce and ginger for 20 minutes, flipping twice.

  2. In a large wok (or other pan, but I find a wok works beautifully) begin heating your oil. You need it to be hot, between 320 and 350oF, or the batter in the chicken will absorb too much oil in cooking.

  3. Grind a bit of pepper over the chicken and cut it into large chunks, about 3 chunks per chicken thigh.

  4. In a separate bowl, mix together the flour and starch of your choice.

  5. Transfer the chicken to the flour mixture and stir to coat evenly.

  6. Add 1/4 cup of water and mix until you've got a nice gummy coating on the outside.

  7. On a separate burner in a nonstick pan, place the carrot slices, 2 cups of water or chicken broth, and 4 large curry roux cubes. Simmer on medium heat while frying the chicken, stirring every now and then until the curry roux cubes are dissolved and the curry begins to thicken.

  8. Begin moving the chicken from the bowl and gently submerging in the hot oil. Only 4-6 pieces should be fried at a time, and they should be gradually added so as to not bring down the temperature of the oil. Fry until golden and crisp and put on a paper towel to drain.

  9. On a plate with white rice, put 3-4 chicken pieces and cover with curry roux.

  10. Serve with Japanese Fukujin-zuke pickles if you have them.


Want to go for a lighter, non-fried version? Try this recipe from Bebe Love Okazu - I haven't tried it but it looks good!

A story, a beginning, and a recipe


If you had asked me when I was twelve where on the map New Hampshire was I am not sure I'd be able to tell you if it was even an American state. So how did I end up here? How did a little Memphis, Tennessee girl end up going from a state that gets one inch of snow annually to a state where you're lucky if you get only two feet in a year? It's all because of the internet. No, no... I didn't google "coldest places to live in the USA" - I just fell in love. On the internet.

I met my husband when I was thirteen. Obviously he wasn't my husband now. In fact I thought he was a freaking weirdo because, being fourteen, he thought it was "wicked" cool to use jive talk from the sixties. Cool Cat. Well somehow we ended up talking...and talking...and talking... for years. Four years to be exact. We talked from ages thirteen to seventeen. Then we decided to meet. It was the summer before I was headed to college in Missouri. Well the second he was off the plane it was decided - it was love and we knew it.

I finished college, and not having any particular ties to any specific part of the US (I had been moved from house to house - never staying in the same place more than 2 years - and eventually moved from Tennessee to Mississippi.) I packed up my 1999 Ford Taurus in 2008 with all the belongings I could possibly cram, and two dogs, and a boyfriend, and we drove from Missouri to New Hampshire - Damn that's a long drive.

We were married shortly after, and just celebrated our two year anniversary, and that is how I ended up here. With no real plans to leave. The truth of the matter is that I have a job I love, and I live somewhere I feel safe, and I am just a stone's throw from the culture of Boston or the ocean or the moose of Maine and Canada. It's a great place. Cold, but great.

We now rent a house that's in the family, and it's still flaunting its mid 20th century Youngstown Teppan range and oven. The double-oven was partly out of commission until today when it was repaired, so I am starting this blog in honor of that (and because I love to cook - but this is more romantic). I'm ecstatic to have my in-oven rotisserie back in operation, and even though only two of the four of the eyes on my rangetop work and they have one heat (hot, and hot) - I can't explain how glad I was that we didn't have to have it replaced. There is something beyond romantic about my retro house. We've settled into its retro-ness. We've made it ours.

Here is a recipe I made just yesterday. I was trying desperately to find something that would recreate the delicious Thai Butternut Squash soup I had at the Salem,MA New England Soup Factory. I lucked upon this recipe from Allotment 2 Kitchen that had a good base soup that I ran with. I had never had a butternut squash until I attended my first Yankee Thanksgiving with my husband's parents, so to me it's the most New England vegetable in existence and quite appropriate for a first blog post.

Thai Butternut Squash Soup

Ingredients:

  • 400 ml (1.7 cups) light coconut milk
  • 4 tsp. Thai red curry paste
  • 1/2 tsp salt
  • 1 pint (2 cups) vegetable stock
  • Zest of half a lime
  • 1 medium/large butternut squash (about 4 cups cubed)
  • 1 tbsp olive oil

1. Roast the butternut squash in a tablespoon of olive oil at 400°F for 30 to 40 minutes, or until tender. Be careful not to let the squash over brown or burn.
2. Either mash or puree the squash. I think pureeing at this stage will provide a better texture for the finished soup.
3. In a large 6 to 8 cup pot, whisk together all the ingredients until smooth.
4. Bring to a simmer and continue to simmer gently on medium heat for 15 minutes (you can imagine how much fun simmering something is on a stovetop that only functions on the high heat setting).
5. Taste for spice and consistency. Add more red curry paste or lime zest to taste. If the consistency is not smooth at this point, pureeing will provide a smooth, whipped consistency that is very creamy. If your squash was overly large (They grow huge up here!), consider adding some heavy cream or more coconut milk.

Serves 5

Nutrition: Calories 150, Carbs 23g, Fat 6g, Protein 1g